

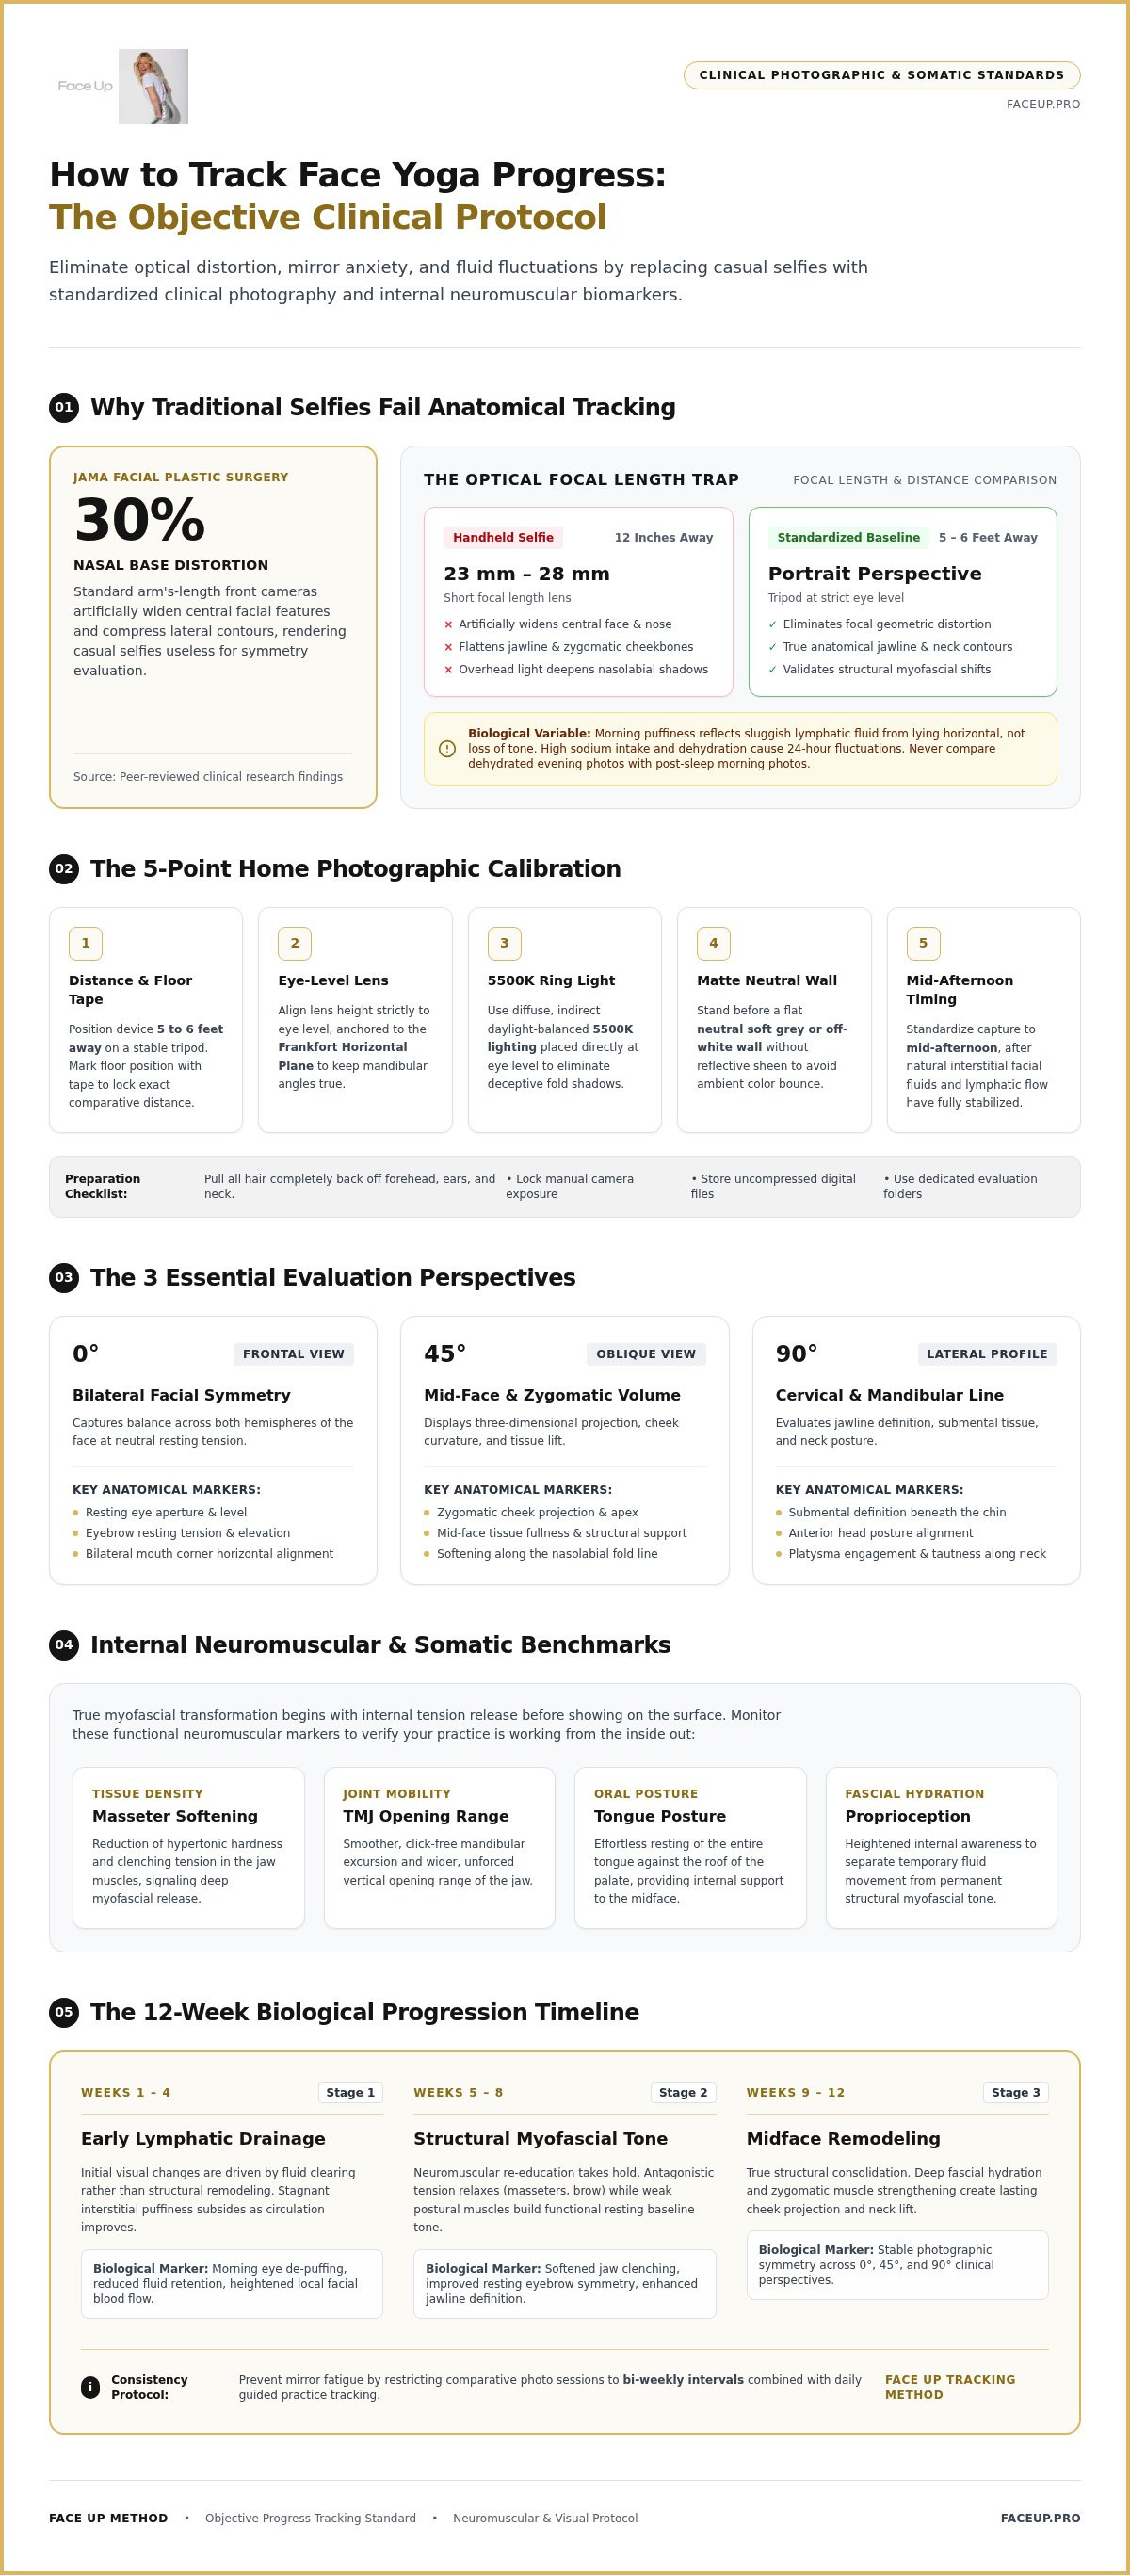
According to research published in JAMA Facial Plastic Surgery, standard arm's-length selfies distort your nasal base by roughly 30%, making casual front-camera photos practically useless for evaluating structural symmetry. If you've been searching for how to track face yoga progress with confidence, relying on shifting bathroom lighting and handheld snapshots will only distort your reality.
It's deeply frustrating to scrutinize your reflection, wondering whether you're seeing genuine cheek fullness or simply an accidental tilt of the head. That uncertainty often pairs with a lingering worry that incorrect muscle engagement might be reinforcing habitual jaw clenching or etching new expression lines. You deserve a clear, dependable feedback loop. You'll learn how to replace daily mirror anxiety with objective photographic standards and precise somatic benchmarks that measure true fascial hydration, masseter relaxation, and structural symmetry.
Ahead, we break down the clinical photography guidelines and internal neuromuscular markers that confirm your facial practice is working from the inside out.
Key Takeaways
- Eliminate perspective distortion by setting your camera at least five feet away with balanced lighting, bypassing the deceptive proportions of standard handheld selfies.
- Discover how to track face yoga progress using a repeatable five-point visual protocol anchored to clinical landmarks like the Frankfort Horizontal Plane.
- Monitor essential somatic biomarkers, including masseter tissue softening, TMJ opening range, and tongue posture, to verify internal tension release.
- Follow a realistic 12-week biological timeline that distinguishes early lymphatic drainage from genuine structural tone and midface remodeling.
- Maintain long-term consistency without mirror fatigue by shifting to bi-weekly photographic checks and daily guided tracking in the Face Up App Subscription.
Why Traditional Selfies Fail: The Science of Measuring Facial Change
Most people instinctively track their results by snapping a quick handheld photo in front of a bathroom mirror. While convenient, this casual method introduces major optical errors that mask genuine anatomical development. Standardizing your documentation protocol is the single best way to separate authentic facial changes from optical illusions when learning how to track face yoga progress.
A smartphone camera held at arm's length introduces substantial geometric distortion. At close range, wide-angle lenses artificially widen the center of the face while flattening lateral structures like the jawline and cheekbones. Uncontrolled ambient lighting compounds the issue. Overhead bulbs or shifting window light cast deep, variable shadows across the nasolabial folds and tear troughs, creating the false impression of sagging or sudden hollowing. True progress tracking looks past these artifacts, separating surface lighting shifts from authentic tissue restructuring.
Camera Distortion and the Focal Length Trap
Standard smartphone front-facing lenses feature short focal lengths, typically between 23 mm and 28 mm. When held 12 inches away, these lenses artificially inflate central features and visually compress lateral contours. To eliminate this issue, place your phone on a stable surface or tripod five to six feet away, matching portrait-lens perspective. Maintain the lens at strict eye level to keep your jawline, neck, and mandibular angles true to life.
Fluid Dynamics Versus True Muscular Restructuring
Daily fluid shifts can easily derail your visual records. Waking up with morning puffiness reflects sluggish lymphatic drainage from lying horizontal, not a loss of structural tone. Conversely, high sodium intake or mild dehydration can dramatically alter how tightly skin clings to underlying fascia over a 24-hour window.
- Isolate multi-week tissue changes: Never compare a dehydrated evening image with a post-sleep morning photograph.
- Standardize your timing: Capture your progress pictures during mid-afternoon, when resting facial fluids have settled.
- Cultivate deeper awareness: Building baseline proprioceptive awareness helps you feel whether tension release or fluid movement accounts for the shift.
Mastering how to track face yoga progress demands separating these fleeting volumetric fluctuations from long-term myofascial remodeling. By controlling optical variables and accounting for fluid dynamics, you create a baseline you can actually trust.
The Standardized Photographic Protocol: How to Build an Objective Visual Baseline
Reliable visual records require clinical discipline rather than aesthetic curation. When mastering how to track face yoga progress, your goal is pure repeatability. You need an environment where the only variable shifting across twelve weeks is your facial tissue. Securing a matte, neutral wall backdrop free of color bounce, locking your phone's manual exposure, and storing uncompressed files in a dedicated evaluation folder forms the bedrock of objective documentation.
Setting Up Your Home Calibration Space
Begin by setting up a dedicated evaluation spot. Choose a plain, non-reflective wall in a neutral soft grey or off-white tone to avoid color casts. Place a strip of tape on the floor to guarantee you stand at the exact same distance for every check-in. Use diffuse, indirect lighting or a daylight-balanced 5500K ring light placed directly at eye level to eliminate deceptive shadows. Finally, pull all hair completely off your forehead, ears, and neck to reveal your full perimeter.
The Three Essential Angles for Accurate Tracking
Capturing three-dimensional structural shifts requires three standardized static perspectives:
- Frontal view (0 degrees): Assesses resting eye levels, eyebrow resting tension, and bilateral mouth corner symmetry.
- Oblique view (45 degrees): Highlights zygomatic cheek projection, mid-face volume, and softening along the nasolabial line.
- Lateral profile (90 degrees): Evaluates submental definition beneath the chin, anterior head posture, and platysma engagement along the neck.
Eliminating Dynamic Expression Variables
Unconscious micro-expressions easily invalidate comparative photos. Never smile during evaluation frames, as active contraction artificially lifts tissue and masks resting tone. Keep your gaze parallel to the floor, eyes relaxed, and maintain teeth gently parted with lips lightly touching to neutralize clenching habits.
Establishing an uncompressed baseline before beginning focused neuromuscular routines, such as the Jaw Release Course, ensures you capture true fascial unwinding rather than momentary posturing. This disciplined protocol delivers absolute clarity, giving you total confidence in how to track face yoga progress without second-guessing your reflection.
Beyond the Mirror: Somatic Markers and Functional Benchmarks to Monitor
Visual changes only tell half the story. If you evaluate your face solely through photos, you miss the crucial neuromuscular repatterning that happens beneath the skin. Understanding how to track face yoga progress requires tuning into somatic biomarkers, such as tissue tenderness, oral resting posture, and craniomandibular freedom. True tone is never rigid. A healthy, lifted face feels supple and mobile, while chronic tightness indicates hypertonicity and stress.
Your nervous system directly regulates facial tension. When stress triggers subconscious clenching, the masseter and temporalis muscles lock up, pulling surrounding fascia downward and restricting lymphatic drainage. Monitoring the frequency of tension headaches and tracking your daytime oral posture provide reliable proof of fascial decompression long before subtle structural changes register on camera.
Myofascial Palpation and Tissue Softness Testing
Perform a manual palpation test once a week to monitor tissue quality. Press the pads of your index and middle fingers firmly into your masseter muscle, located along the back edge of your cheek just below the cheekbone. Rate the localized tenderness on a simple scale from one to ten:
- Grades 8 to 10: Sharp tenderness or dense, rope-like fascial adhesions indicate acute clenching.
- Grades 4 to 7: Mild discomfort reveals resolving hypertonicity with softening muscular trigger points.
- Grades 1 to 3: Pliable, pain-free tissue confirms functional unwinding and balanced muscular tone.
Hypertonic muscles feel hardened, like cold butter under pressure. As your somatic practice deepens, that tissue shifts to feel elastic and yielding.
Functional Postural Benchmarks and TMJ Comfort
Notice what your jaw does when your attention is elsewhere. In an ideal resting state, your lips remain sealed, teeth stay slightly apart, and your entire tongue rests suctioned against the roof of your mouth. Catching yourself clenching during stressful tasks reveals that your motor habits still need retraining.
You can also track joint range of motion through the three-knuckle test. A healthy, fully decompressed temporomandibular joint allows you to comfortably insert three stacked proximal knuckles between your front teeth, measuring roughly 40 to 50 millimeters of functional opening. If opening feels restricted, clicks, or pulls asymmetrically to one side, exploring targeted tmj massage therapy offers an effective way to restore structural balance. Pairing physical mobility checks with visual calibration gives you a complete, honest blueprint for how to track face yoga progress accurately.
The 12-Week Transformation Timeline: What Realistic Progress Looks Like
Real anatomical change follows a biological sequence, not an overnight schedule. When you understand how to track face yoga progress across twelve consecutive weeks, you stop mistaking temporary fluid shifts for permanent restructuring. You also avoid abandoning your routine during natural plateau phases. Fascial remodeling, muscle tonus, and neuromuscular repatterning unfold in distinct physiological phases.
Documenting non-linear progress across this twelve-week arc keeps your motivation anchored in reality. Some weeks bring profound tissue softening, while others solidify muscle tone beneath the surface without dramatic visual changes.
Phase One (Weeks 1-2): Fluid Drainage and Tissue Awakening
Initial changes stem from fluid mobilization rather than muscular restructuring. Gentle somatic stimulation activates sluggish lymphatic pathways, clearing excess interstitial fluid. You'll likely observe clearer under-eye contours and diminished morning puffiness within days. Mild muscular fatigue is normal as dormant mimetic muscles wake up. Deep structural changes will not appear yet, so focus your tracking purely on fluid dynamics and tissue hydration.
Phase Two (Weeks 3-6): Neuromuscular Control and Tension Release
Between weeks three and six, the brain strengthens its motor pathways to the face. You'll develop voluntary muscle isolation, such as activating the zygomaticus major to lift the cheeks without recruiting the frontalis muscle to wrinkle the forehead. Unconscious clenching during working hours begins to dissipate. Knowing how to track face yoga progress during this phase means logging qualitative sensory improvements in a dedicated journal rather than hunting for radical profile changes.
Phase Three (Weeks 7-12): Structural Toning and Symmetry Balance
Visible myofascial remodeling and tissue elevation take hold past the seven-week mark. Compare your standardized eight- and twelve-week evaluation photographs directly against baseline images. You should see genuine cheek elevation, sharper jawline contours, and balanced resting facial symmetry.
- Assess lateral definition: Check whether platysma bands relax and cervical posture improves.
- Integrate manual therapy: Relieve deep masseter adhesions using targeted manual techniques or a dedicated tmj massage tool to accelerate tissue recovery.
- Evaluate bilateral symmetry: Confirm that both sides of the mouth lift evenly at rest.
To take the guesswork out of your transformation and follow an evidence-based roadmap, explore the Face Up Method to begin tracking genuine structural results.
Building a Sustainable Tracking System with the Face Up Method
Consistency collapses when tracking turns into hyper-fixation. Inspecting your reflection multiple times a day fuels unnecessary anxiety without revealing real physiological shifts. The most effective way how to track face yoga progress is by establishing a calm, structured routine that respects tissue adaptation cycles. By pairing disciplined bi-weekly visual audits with daily guided practice, you protect your emotional well-being while reinforcing neuromuscular motor memory.
Facial rejuvenation is an intentional, iterative process. When you remove obsessive mirror checking, you create space for the nervous system to downregulate, which is the exact biological state required for lasting fascial release.
Structuring Your Bi-Weekly Evaluation Ritual
Set aside ten minutes every other Sunday to conduct your photographic evaluation. Step into your calibrated home space, snap your three standardized frames, and close your camera roll. Complement these images with a rapid three-point somatic scan, rating tension across your jaw, lateral neck, and brow on a 1-to-5 scale. When assessing changes, place images side by side using split-screen alignment tools rather than relying on memory, which is notoriously prone to cognitive bias.
Integrating Daily Guidance with the Face Up App
Self-directed practice works best with precision feedback. Even minor errors in finger pressure or directional vectoring can accidentally recruit compensatory muscles. Activating the Face Up App Subscription gives you access to step-by-step video sequences designed to preserve ideal technique, vector direction, and duration. Built-in tracking features log your consistency automatically, pairing somatic bodywork with progressive sculpting movements so you never wonder whether you completed your daily routine correctly.
Transitioning from Self-Care to Professional Mastery
As you refine your somatic awareness and learn how to track face yoga progress with anatomical precision, you might notice an intuitive knack for recognizing fascial restrictions. Many dedicated practitioners find that mastering their own facial tension opens the door to guiding others. If you feel called to transform this tactile knowledge into a fulfilling career, exploring advanced training through a facial sculpting certification provides the anatomical groundwork you need. You can achieve formal professional standing through the Face Up Method Certification, mastering proprietary intra-oral unwinding and postural sculpting techniques to launch your own clinical somatic practice.
Transform Your Reflection Through Somatic Precision
True transformation occurs well beneath surface aesthetics. Replacing distorted smartphone selfies with calibrated visual standards eliminates self-doubt and gives your practice absolute credibility. By uniting objective photography with internal somatic benchmarks, such as masseter elasticity and TMJ decompression, you'll discover the definitive framework for how to track face yoga progress with genuine confidence.
Facial sculpting is an intentional dialogue with your nervous system. Built on a proprietary somatic facial sculpting method designed by specialist Olga Newman, our comprehensive curriculum is trusted by international holistic wellness practitioners seeking authentic tissue rejuvenation. Sustainable structural shifts take time, but with a reliable protocol, every milestone becomes clear and rewarding. Give yourself permission to abandon daily mirror scrutiny and honor your body's natural adaptation timeline. Start your guided facial transformation with the Face Up App, and experience the lasting ease of balanced, radiant alignment.
Frequently Asked Questions
How often should I take progress photos during a face yoga routine?
Take evaluation photos once every two to four weeks rather than daily. Daily or weekly snapshots capture fleeting fluid fluctuations rather than true myofascial adaptation, which can easily trigger unnecessary frustration. A bi-weekly schedule gives your facial tissues and neuromuscular pathways adequate time to remodel. This interval protects your emotional perspective while providing clean, reliable visual checkpoints across your twelve-week journey.
Why do my face yoga progress photos look different in different rooms?
Shifting overhead angles and varying color temperatures drastically alter how light casts shadows across your facial contours. A warm bulb in a bathroom accentuates under-eye hollows and nasolabial folds, while diffuse window light flattens depth. To eliminate these deceptive variables, designate a single evaluation wall and use consistent, daylight-balanced lighting set directly at eye level for every session.
What are the first signs that facial exercises and somatic sculpting are working?
The earliest indicators are enhanced fluid mobilization and increased sensory awareness rather than dramatic structural lifting. During the initial two weeks, you will likely notice reduced morning puffiness, clearer definition along the jawline, and softer masseter muscles. Many practitioners also report catching themselves clenching far less during stressful moments, which confirms that the central nervous system is releasing chronic holding patterns.
Can face yoga cause new wrinkles if I do the exercises incorrectly?
Uncontrolled muscular compensation can etch unwanted dynamic expression lines if you perform movements without proper stabilization. Furrowing the brow while attempting to isolate the cheek muscles, for example, reinforces habitual tension. Mastering how to track face yoga progress involves watching for unintended skin folding and prioritizing tissue softness over aggressive, high-repetition contractions so your skin remains smooth.
How do I track progress if my primary goal is releasing jaw tension?
Track functional mobility markers, tissue elasticity, and oral resting habits alongside your photos. Regularly test whether you can open your mouth to a comfortable three-knuckle width without joint deviation or clicking. Enrolling in a structured program like the Jaw Release Course provides guided somatic protocols to help you monitor diminishing masseter density, fewer tension headaches, and sustained jaw decompression week after week.
Is it normal for my face to feel tired or sore after starting facial exercises?
Mild muscular fatigue is entirely normal during your first two weeks as dormant facial muscles adapt to novel motor recruitment. That sensation should feel like gentle awakening rather than strain. You should never experience sharp joint tenderness, acute TMJ pain, or worsening headaches. If uncomfortable tightness arises, lighten your manual pressure, focus on restorative lymphatic strokes, and allow your tissues to rest.
What tools help me take objective before-and-after photos at home?
A simple tripod equipped with a smartphone mount, a remote shutter button, and floor tape markers are the best tools for home tracking. Placing your camera five to six feet away eliminates the wide-angle facial distortion inherent in handheld selfies. A remote trigger lets you keep your shoulders and facial muscles relaxed, giving you a repeatable framework for how to track face yoga progress accurately.


