
Facial acupressure isn’t a single brow-lifting switch; it’s a routine of manual pressure on selected points. To try a brow-focused sequence, locate the Third Eye point between the eyes and Gallbladder 14 about 1 inch above each pupil, then repeat the brow motion 10-15 times. These are among the acupressure points for face lifting described in facial massage routines.
It’s reasonable to wonder whether acupressure points for face lifting can make a visible difference. This guide explains how acupressure and meridians are described, how to work the brow points with a light, controlled touch, and what facial massage may do for skin appearance. You’ll also learn how to approach a routine safely and assess claims about lifting, tone, or texture.
Key Takeaways
- Use a light, comfortable touch and small, controlled movements; pressure should never cause pain or leave a mark.
- Learn how facial acupressure points and meridians are described, then locate the brow points carefully before beginning a massage.
- Understand what massage may contribute to circulation and skin appearance, and why these effects aren’t the same as a guaranteed lift.
- Adapt or pause a routine when your skin is irritated or sensitive, and pay attention to how your face responds.
- Explore structured facial-sculpting education through Face Up Method Certification if you want to build practitioner skills beyond personal self-massage.
Pressure and massage guidance
Facial acupressure uses manual or tool-assisted pressure on selected points. Facial massage usually involves broader strokes, while gua sha glides a smooth tool across the skin. Cosmetic treatments are separate interventions, not another name for either practice.
- Begin with clean hands and a relaxed face, then gently locate each point with your fingertips. Acupressure focuses on specific locations, so avoid dragging the skin as you find them.
- Use pressure that feels distinct but does not cause pain or leave a mark. Ease off if the skin feels tender, looks irritated, or becomes uncomfortable.
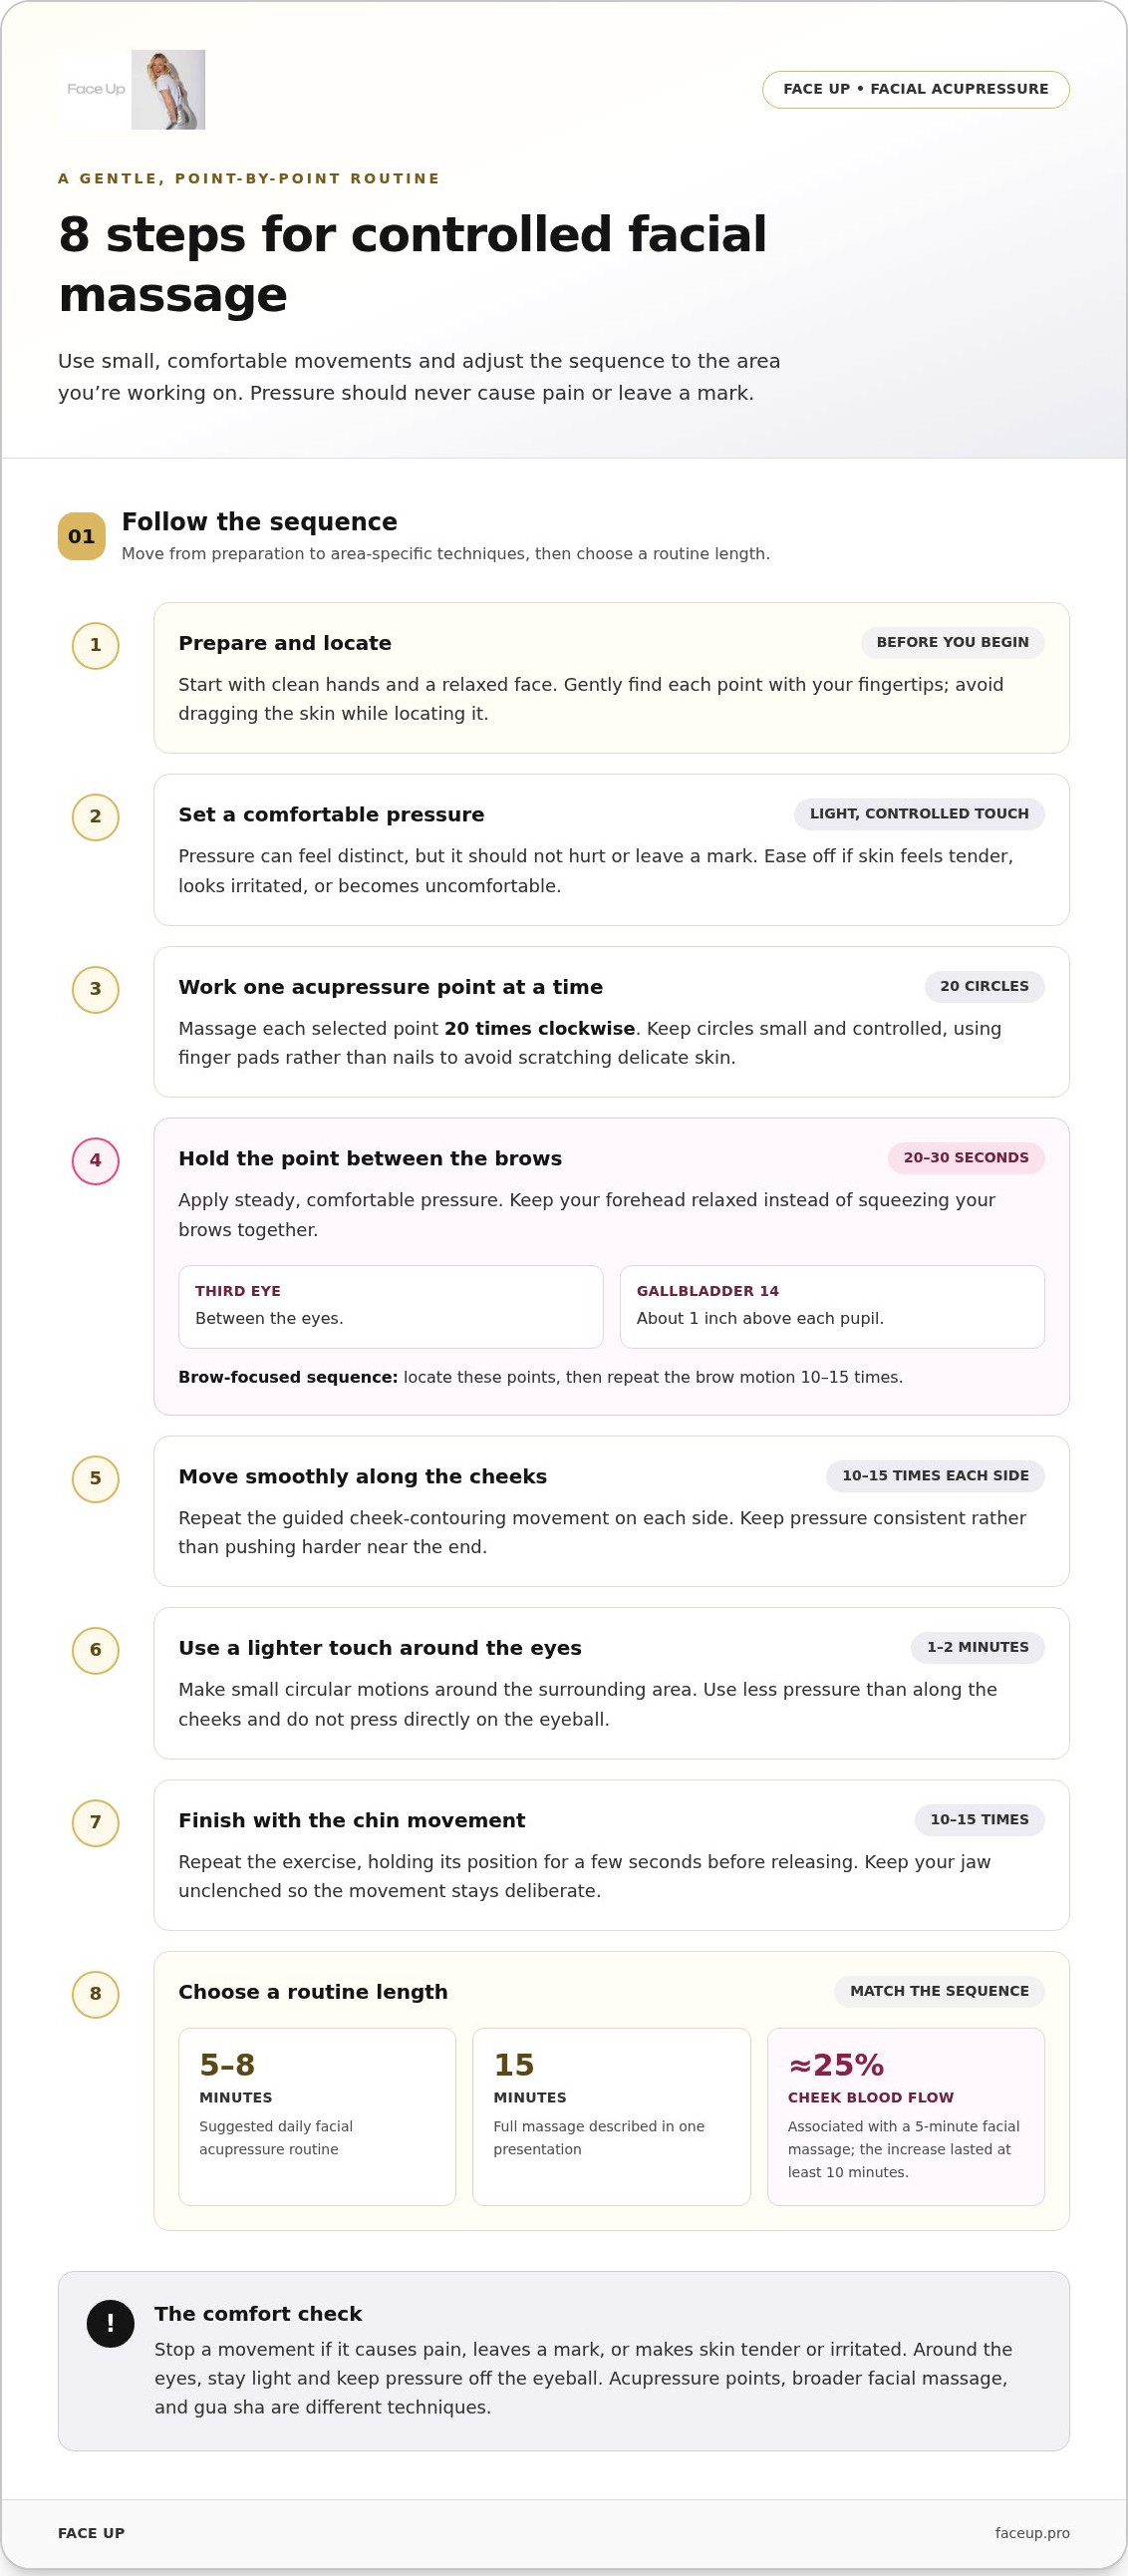
- Massage each selected acupressure point 20 times in a clockwise direction. Keep the circles small and controlled, using your finger pads rather than nails to prevent scratching delicate facial skin.
- For the point between the brows, apply steady, comfortable pressure for 20 to 30 seconds. Keep your forehead relaxed instead of squeezing your brows together as you hold the position.
- For cheek contouring, repeat the guided movement 10-15 times on each side. Move smoothly along the cheek area, and keep the pressure consistent rather than pushing harder near the end.
- Around the eyes, make small circular motions for 1-2 minutes. Use a lighter touch there than along the cheeks, and stay on the surrounding area rather than pressing directly on the eyeball.
- Repeat the chin exercise 10-15 times, holding its position for a few seconds before releasing. Keep your jaw unclenched so the movement stays deliberate instead of turning into a strain.
- Choose a routine length that matches its sequence: a suggested daily facial acupressure routine takes five to eight minutes, while the full massage described in one presentation takes 15 minutes. A five-minute facial massage was associated with an approximately 25% increase in cheek blood flow, lasting at least ten minutes.
Use the 20-circle approach point by point, rather than treating every stroke as interchangeable. A broader facial massage can include sweeping movements, while gua sha involves a tool; neither changes the need for a comfortable touch. If a movement causes pain or leaves a mark, stop that movement and reduce pressure before continuing.
Safety cautions and who should take care
- Start with clean hands and a clear view of your face. Remove jewelry that could catch or scratch, and use your finger pads rather than your nails. Before touching your skin, check for cuts, irritation, or existing soreness, and leave those areas alone.
- Keep pressure comfortable and controlled. Acupressure should feel like gentle contact, not sharp pain, pinching, or forceful pushing. If a point hurts, stop and release your fingers. Don’t continue just to complete a sequence or reach a target number of circles.
- Avoid pressing directly on your eyeballs or dragging the skin around your eyelids. Keep any movement near the eyes small and light, using the surrounding bone as a boundary. If you experience discomfort, watering, or blurred vision during a facial routine, stop and let your eyes rest.
- Skip massage over broken, inflamed, or visibly irritated skin, including a fresh scratch or painful blemish. Rubbing the area can add friction and increase discomfort. Work around it instead, and return only when the skin looks and feels settled.
- Take extra care after a cosmetic procedure or while your face is healing from an injury. Don’t press or massage the treated area unless your aftercare instructions allow it. Healing needs vary by procedure and area, so follow the specific directions you received rather than applying a general facial routine.
- Notice how your skin responds during and after each session. Stop if you see a mark, persistent redness, swelling, or feel new tenderness. Don’t increase pressure to chase a stronger effect. A comfortable touch is the practical limit, even when a point feels difficult to locate.
- If a medicine or health condition makes your skin unusually sensitive, keep the routine minimal and avoid trying stronger pressure. Never change prescribed medicine to accommodate facial massage. Note which movement caused discomfort so you can avoid repeating it.
- Choose a simple sequence when you’re unsure how your skin will respond. Try one area at a time, then pause and observe before continuing elsewhere. If you prefer guidance with hands-on facial technique, explore a guided facial sculpting treatment rather than pressing harder or adding more movements yourself.
Skin quality and wrinkle reduction
Facial acupressure routines target particular concerns, but point massage and facial exercise are different practices. A 20-week facial-exercise trial found that women aged 40 to 65 looked about three years younger to blinded raters; that finding describes exercise, not acupressure.
- Set a realistic goal before you begin. For puffiness, notice whether gentle massage changes your face’s appearance immediately afterward. For wrinkles, distinguish a short-term change in appearance from lasting structural change. Jaw tension is a separate concern, so notice whether you are clenching or holding tension before choosing a routine.
- Use the Four Whites points as just one part of a careful routine. They sit approximately one finger’s width below the eyes. One described routine recommends daily massage to address blemishes and breakouts. Keep contact light in this delicate area, and stop if the skin becomes sore or irritated.
- Consider Heavenly Pillar when focusing on skin texture or breakouts. These points are at the base of the skull, slightly to either side of the spine. The described routine associates them with those concerns, but point massage is not a substitute for treating a skin condition.
- Track skin texture over a few weeks rather than judging each session. Cumulative changes in texture and tone are described after a few weeks of near-daily practice. Use the same mirror and lighting each time, since different light can change how fine lines and texture appear.
- Keep claims about wrinkles separate from findings on circulation. Regular facial massage over five weeks improved blood vessels’ ability to dilate on their own. This finding concerns blood-vessel response; it does not establish that acupressure erases wrinkles or permanently lifts skin.
- Pair massage with basic skin care rather than replacing it. Cleanse in the morning and evening, apply moisturizer, and wear sunscreen. These steps support everyday skin care, while facial massage is a separate practice. Don’t rub sunscreen or moisturizer vigorously into your skin.
- Track jaw tension separately from skin changes. For example, note whether your jaw feels tight before a session and whether it feels more relaxed afterward. This records your immediate experience, not a wrinkle result or lasting change in facial structure.
- Choose a treatment goal you can assess clearly, such as texture, breakouts, or jaw tension. A routine using Four Whites points differs from one focused on facial exercise. Keeping your goal specific helps distinguish the technique from the effect you are observing.
Brow-lifting technique
- Begin with a relaxed forehead and look straight ahead into a mirror. This gaze helps you locate Gallbladder 14, also called GB14, by using the pupil as a reference. Keep your eyebrows relaxed rather than raising them to make the point easier to find.
- Find GB14 approximately 1 inch above the pupil on each side. Locate the position above each eye while looking straight ahead, then use a fingertip to make gentle contact. Compare both sides before applying pressure so the points are placed evenly.
- Find the Third Eye point in the middle of your forehead, between the eyes. Use it as a central point in the sequence, distinct from the paired GB14 points above the pupils. Keep your touch controlled and avoid pressing toward the eyes.
- Place a fingertip on one GB14 point and make the brow-acupressure motion in small, deliberate movements. The routine recommends repeating this motion 10-15 times. Keep your forehead soft as you move, rather than scrunching or lifting the brow muscles during each repetition.
- Repeat the same motion at the other GB14 point for 10-15 repetitions. Matching the movement on both sides keeps the sequence balanced. Use the same gentle contact on each side, and avoid increasing pressure simply because one point feels less noticeable than the other.
- Move to the Third Eye point between the brows and apply steady, comfortable pressure. Keep your eyes relaxed and your head still. This point sits on the midline, so use the space between your eyebrows as a guide rather than shifting toward either eye.
- In facial acupressure presentations, GB14 is described as a point for lifting sagging eyelids. Treat that as the routine’s intended cosmetic focus, not as an instruction to push the eyelid itself. Keep pressure on the brow area above the pupil, away from the delicate eye surface.
- Finish by releasing contact and noticing how your brow feels at rest. Check both sides in the mirror with the same neutral expression you used before starting. A relaxed brow makes it easier to compare your appearance without mistaking a lifted expression for a change from massage.
How acupressure points and meridians are described
Facial acupressure uses named locations and point codes to describe where pressure is applied. Commonly described facial-lifting points include Third Eye, Gallbladder 14, Stomach 2, and Four Whites, each identified by a position on the face.
- Read point names as labels for locations within a traditional mapping system. For example, Gallbladder 14 is also written GB14, while Stomach 2 appears as ST2. These names help distinguish one point from another; they don’t describe a guaranteed cosmetic effect.
- Locate Third Eye at the middle of the forehead, between the eyes. Use the space between the brows as your landmark, then keep the point distinct from GB14, which sits above each pupil.
- Find Gallbladder 14 about 1 inch above the pupil when looking straight ahead. Use the pupil as a vertical guide on each side. This location is commonly included in brow-focused routines, so identify it before applying pressure.
- Locate Stomach 2 about 1 inch directly below the pupil while looking straight ahead. The point is on the cheek area, not at the brow. Comparing its position with GB14 shows how named points refer to separate facial landmarks.
- Find Four Whites approximately one finger’s width below the eyes. Facial Beauty points are described on either side of the nose, slightly beyond the nostrils. Use these descriptions to distinguish the locations, and avoid pressing into the eye socket.
- Notice that a facial routine can include points beyond the face. One described routine contains 21 points in total, with 18 on the face and one on the neck. That count shows why a sequence may use point names across connected areas.
- Use the point code as a location cue, not as proof of a lifting mechanism. A routine may describe GB14 for the brow, Stomach 2 below the pupil, and Four Whites below the eyes. The practical task is to identify each point gently and consistently.
- Connect the map to the movement you plan to practise. Choose one named point, locate it using its landmark, and follow the routine’s pressure guidance. For a structured approach to facial technique, explore guided facial sculpting.
Meridian terms, when used with point names, can be understood as part of the traditional mapping vocabulary; they do not by themselves establish a cosmetic result. The case protocol instructed the patient to use the instrument-assisted acupressure tool daily for 10 days during the home-treatment period described.
The page describes microcurrent therapy as having been around since the 1970s. These are separate treatment descriptions, and their timelines alone do not show that they share a mechanism or outcome.
Face Up: Face Up Method Certification
Face Up Method Certification is a next step for practitioners who want to learn Face Up’s approach to facial sculpting and somatic bodywork. It suits those looking beyond personal self-massage to develop skills for practitioner work.
For personal practice, the Face Up App Subscription supports daily rituals, while the Jaw Release Course focuses on tension around the jaw. Those seeking hands-on facial sculpting can explore the Face Up Sculpting Treatment. Each offering serves a different need, from guided self-practice to professional learning or a treatment experience.
Choose the path that fits your goal: learning the method, building a home practice, or receiving facial sculpting. Contact Face Up to explore the next step that feels right for you.
Choose a thoughtful next step
Let your next step be guided by the goal you want to support, not pressure to change your appearance quickly. Treat acupressure points for face lifting as a mindful self-care practice: notice facial tension, pay attention to how your skin responds, and keep your touch comfortable. A brief note after each session can help you identify which movements suit your routine.
For ongoing self-practice, Face Up offers the Face Up App Subscription and Jaw Release Course. Practitioners who want to deepen their professional work can explore Face Up Method Certification. Each offers a different direction, from daily personal practice and focused jaw work to professional learning.
There’s no need to rush into a more elaborate routine. Choose the next step that fits your interest and experience, then build your practice with care. Contact Face Up for facial care, and continue at a pace that feels right for you.
Frequently Asked Questions
Does facial acupressure really work?
Facial acupressure may have temporary circulation and relaxation effects, but it should not be treated as a proven lasting lift. Acupressure points for face lifting are selected by location and traditional point names; pressing them does not establish that facial structure changes. Assess a routine by its immediate effects and your comfort, and distinguish the feeling of a relaxed or warm face from permanent cosmetic change.
Are There Other Ways To Improve Your Skin Without Creams and Serums?
Yes. Non-product approaches include facial massage, facial exercises, and everyday sun protection. Each has a different purpose: massage involves manual movement, while facial exercises use repeated muscle actions. A routine can also include gentle cleansing and habits that limit unnecessary skin irritation. Choose an approach based on your main goal, such as supporting skin appearance or releasing facial tension, rather than expecting one method to address every concern.
Can it really replace Botox?
No. Acupressure and Botox are different approaches, and manual pressure should not be presented as a substitute for a cosmetic medical treatment. Acupressure applies touch to selected points; it does not provide the same intervention or promise comparable results. If you want a particular cosmetic change, consider which outcome matters to you and distinguish a self-care routine from a medical procedure before deciding what suits you.
Do I need oil or a tool?
No. You can apply pressure to points with your fingertips; a tool is optional. Oil is not needed to locate a point or apply pressure. A slippery product may change how your fingers glide, which matters more for broad massage than focused point contact. Choose a method you can control comfortably, and don’t add a tool just to make the routine feel more intensive.
How long until I see a difference?
Facial routines describe different timelines for immediate sensations and gradual changes in appearance. A flush or relaxed feeling is a short-term response, while cumulative changes in skin texture and tone are associated with a few weeks of near-daily practice. These effects are not interchangeable: feeling relaxed does not demonstrate a lift. To compare your appearance, use similar lighting and a neutral expression each time.
What Are Acupressure Points?
Acupressure points are named locations where a routine applies manual or tool-assisted pressure. In traditional point maps, names such as Gallbladder 14 and Stomach 2 identify different facial locations. Meridians are the pathways used to organize these points in that mapping system. For practical self-massage, treat each name as a location cue, then use the described facial landmark to find the point.
How do you apply acupressure to facial lifting points step by step?
First, choose a point and identify its landmark, such as the middle of the forehead for Third Eye. Place a fingertip gently, then make the movement assigned to that point. For a brow-focused sequence, locate Gallbladder 14 above each pupil and repeat the brow motion 10-15 times. Work each side deliberately, keep your face relaxed, and stop if contact becomes painful.
How long and how often should you massage facial acupressure points?
A suggested daily facial routine takes five to eight minutes. One approach is to practise daily for a couple of weeks, then continue a few times weekly for maintenance. A longer presentation describes a full massage lasting 15 minutes, so follow the timing of the routine you’re using rather than extending it unnecessarily. Consistent, comfortable practice matters more than adding extra pressure or movements.


