

Small, controlled movements are a better starting point than pulling hard at your skin. A practical routine can include gentle cheek-lifting movements and cheek presses, performed with control. The key is to practise gently and consistently rather than force a dramatic movement.
If your cheeks look less lifted than before, it’s natural to wonder whether exercises for lifting sagging cheeks can make a visible difference. They may help you practise facial muscle engagement, but results take time and vary from person to person. This guide covers how to do the movements with control, how often to practise, and what to notice along the way.
You can complement your routine with massage, hydration, nourishing food, and sun protection. Together, these steps offer a balanced approach, helping you build a facial exercise habit with realistic expectations and a focus on care rather than force.
Key Takeaways
- Use gentle, controlled movements and keep your face relaxed rather than pulling or straining the skin.
- Pair facial exercises with light upward massage, comfortable hydration habits, balanced meals, and daily sun protection.
- Look for gradual changes in freshness and facial definition, and track progress consistently instead of expecting an overnight lift.
- Choose movements that also engage the lower face and jaw, while keeping your neck comfortable and your breathing steady.
- Build a repeatable routine that fits your schedule, then adjust the exercises and practice time to maintain consistency.
Tips for technique, massage, hydration, diet, and sun protection
- Start with a clean face and relaxed shoulders. Sit upright before a mirror, unclench your jaw, and breathe normally as you move. Use light pressure: facial exercises should feel controlled, not painful. Follow a clear instructional sequence, with each movement showing where to place your hands and which direction to move.
- For the Happy Cheeks Sculpting exercise, shape your lips into an “O” and smile upward through your cheeks. Use your fingers lightly to guide the lift without dragging your skin. Hold the cheek lift for 20 seconds, then release. Repeat the exercise 5 times, keeping your forehead and neck relaxed.
- For the puffer fish press, fill your cheeks with air and gently press them inward with your fingers. Keep the air contained rather than pushing hard against your cheeks. Hold the press for 5 to 10 seconds, then relax. Repeat 8 to 10 times, pausing whenever your jaw begins to tense.
- Practise the Cheek Lifter by lowering and lifting your cheeks with a slow, deliberate motion. Keep your mouth soft, and avoid tightening your eyes or forehead to create extra movement. Move your cheeks slowly and deliberately, stopping if the movement feels uncomfortable. Use a mirror to notice whether both sides move evenly.
- Use an instructor’s demonstration to learn where to place your fingers and which muscles to engage. Practise one movement at a time, then compare your posture with the demonstration. A mirror can help you spot raised shoulders, a clenched jaw, or excessive pulling on the skin. Keep the movement small until it feels coordinated.
- For cheek massage, place clean fingertips near the sides of your nose. Glide upward and outward toward your temples, using steady, gentle pressure. Repeat the gentle strokes on both sides as comfortable. In an evening routine, massage the cheeks with oil for 3 minutes, using enough slip to avoid tugging.
- Support your routine with regular water intake and meals that include a variety of whole foods, such as vegetables, fruit, and protein sources. These habits complement facial practice but don’t replace it. Keep water nearby during your routine, and choose balanced meals rather than relying on a single “lifting” food.
- Protect your skin with broad-spectrum sunscreen rated SPF 30 or higher every day. Apply it as part of your morning routine, including when facial exercises happen indoors. Reapply every 2 hours when spending extended periods outdoors. Sun protection supports your broader skin-care routine alongside gentle massage and exercise.
Expected timeline for results
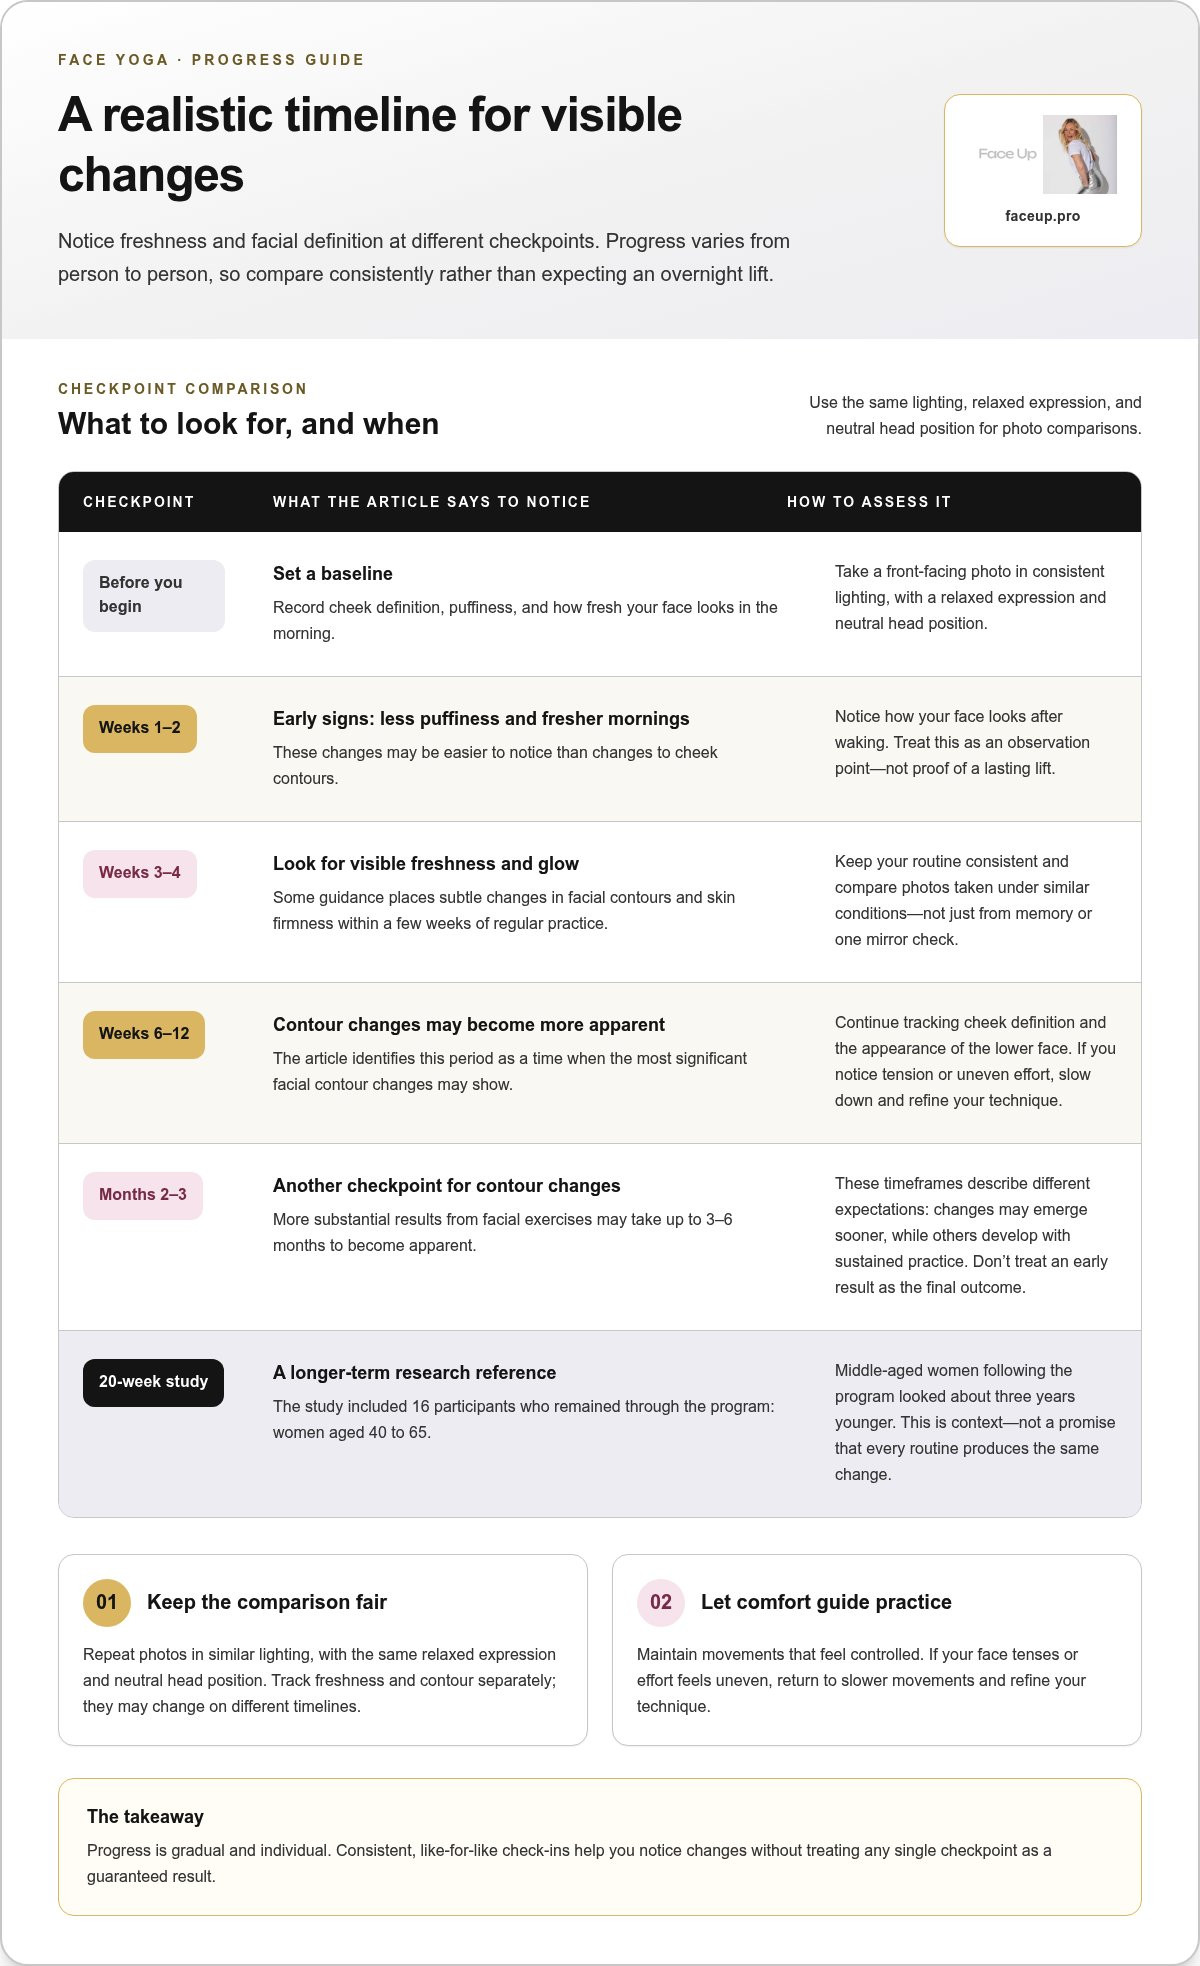
- Set a baseline before you begin. Take a front-facing photo in consistent lighting, with a relaxed expression and neutral head position. Note your cheek definition, puffiness, and how fresh your face looks in the morning. Repeat the check-in under the same conditions later, so changes in lighting or expression don’t distort the comparison.
- During weeks 1-2, pay attention to reduced puffiness and improved morning freshness. These early changes can be easier to notice than altered cheek contours. Practise with gentle, controlled movements, and note how your face looks after waking. Treat this stage as an observation point, not proof of a lasting lift.
- In weeks 3-4, look for visible freshness and glow. Some guidance also places subtle changes in facial contours and skin firmness within a few weeks of regular practice. Keep your routine consistent, and compare photos taken under similar conditions rather than relying on memory or a single mirror check.
- Between 6 and 12 weeks of face yoga practice, the most significant facial contour changes may become apparent. Continue recording the same features, such as cheek definition and the appearance of the lower face. If you notice tension or uneven effort, return to slower movements and refine your technique.
- Months 2-3 provide another checkpoint for significant facial contour changes. More substantial results from facial exercises may take up to 3-6 months to become apparent. These timeframes describe different expectations, from changes that emerge sooner to changes that develop with sustained practice. Don’t treat one early result as the final outcome.
- A 20-week facial exercise study included 16 participants who remained through the program. The participants were women aged 40 to 65, and middle-aged women following the program looked about three years younger. This study offers context for a longer practice period, not a promise that every routine produces the same change.
- Use each checkpoint to guide your next step: maintain movements that feel controlled, adjust technique when your face tenses, and keep photo comparisons consistent. For structured guidance as you practise, explore guided facial exercise routines. Continue observing both freshness and contour, since they may change on different timelines.
Face yoga for jowling and double chin
- Before practising, sit upright, face a mirror, and let your shoulders drop. Keep your head level instead of pushing your chin forward. Notice how your cheeks, jaw, and neck feel at rest. This starting position makes it easier to follow each movement without straining your neck or clenching your jaw instead of engaging your face.
- Begin the Cheek Lifter with a relaxed mouth and a gentle cheek-lowering motion. Lift the cheeks, then lower them again in a slow, controlled rhythm. Repeat the cheek-lowering and lifting movement 10 times. Keep your eyes soft and shoulders still. The mirror helps you notice whether one cheek is moving differently from the other.
- For a cheekbone lift, place your fingertips lightly against one cheek and guide the area upward. Hold the lift for 5 seconds, then release without pulling your skin. Repeat 15 times on each side. Keep your head neutral throughout. The brief hold lets you focus on the cheek movement rather than leaning or tightening your neck.
- Practise the Duchess by forming a small, controlled smile while keeping your lips together. Place your fingers gently near the corners of your mouth, then lift the cheeks without wrinkling your nose. Hold the lift briefly, then repeat it at a comfortable pace. Keep your jaw loose between repetitions, so each lift begins from a relaxed position.
- For Happy Chipmunk, move your cheeks alternately, directing attention to one side and then the other. Keep the movement clear but comfortable, without biting down or pushing your chin forward. Alternate the cheek movements 15 times. If your jaw starts to grip, pause, relax your mouth, and restart with a smaller motion.
- Work through the exercises in sequence: Cheek Lifter, cheekbone lift, Duchess, then Happy Chipmunk. Follow the listed repetitions for each movement, and complete both sides where specified. Keep a steady pace rather than rushing. This gives you a practical way to practise cheek and lower-face movement while keeping an eye on your posture.
- Finish by relaxing your face and checking your reflection again. Compare your jaw position with the starting position, and release any tension around your mouth or neck. Facial movements should remain controlled, not forceful. For other described facial exercises, use 10-15 repetitions as a guide, adjusting the movement to preserve smooth technique.
Potential benefits and drawbacks of facial exercises
Facial exercises engage facial muscles through repeated movements, while skincare focuses on the skin’s surface. Fillers add volume and can last several months; a facelift is a surgical option for repositioning facial tissue.
- Set a practical goal before starting: choose one feature to observe, such as cheek definition or morning puffiness. Facial exercise research involved women aged 40 to 65 who practised a program for 20 weeks. That study offers a useful example of a sustained routine, rather than evidence of an immediate change.
- Consider the potential benefit of regular muscle engagement. In a 20-week facial exercise program, middle-aged women looked about three years younger. This finding describes the participants in that program, not a guaranteed result for every person. Use it as context for setting measured expectations.
- Keep the time commitment in view. Guidance recommends facial exercises for 15-20 minutes per day, several times a week. Choose a practice time you can maintain, then follow a consistent sequence. If a routine feels too long, simplify the number of movements rather than rushing through them.
- Plan for consistent practice. The article recommends continued daily practice to maintain facial exercise benefits after four months. Treat the routine as an ongoing habit, not a short course with a permanent finish line. A calendar reminder or daily cue can help you remember to practise and assess whether the routine fits your schedule.
- Use controlled technique to avoid unnecessary strain. Relax your jaw and shoulders before each movement, and keep your fingers light on your skin. Stop and reset if you notice yourself clenching or pulling hard. A mirror can help you catch tension in your forehead or neck.
- Compare methods by their purpose. Facial exercises involve repeated facial movements, while skincare supports the skin’s surface and sun protection. Fillers add volume, with effects that can last several months. A facelift involves surgery, so its approach and level of intervention differ from a self-practice routine.
- Set expectations according to the method. Exercises offer a structured way to practise facial movement, but they don’t do the same job as skincare, fillers, or surgery. If your main concern is skin texture, focus on skincare habits. If you’re concerned about lost volume or tissue position, facial exercises address a different goal.
- Review your routine at clear checkpoints. Compare consistent photos, note whether movements feel controlled, and record any changes in cheek definition. The 20-week study gives a longer observation window than a brief trial. Keep the practice sustainable, and adjust technique when tension replaces smooth movement.
Recommended frequency and duration of practice
- Choose a schedule you can repeat. A general recommendation is 15-20 minutes per day, several times a week. Put practice beside an existing habit, such as morning face washing, so it has a consistent place in your routine. Regularity matters more than squeezing every exercise into one long session.
- Start with a manageable session rather than rushing through movements. Guided face yoga recommendations include 10-15 minutes daily. Use that duration to practise a small selection carefully, with enough time to reset your jaw and posture between exercises. If your technique becomes hurried, reduce the sequence instead of speeding up.
- Use the study schedule as an example, not a rule for everyone. Participants first practised every day, then continued every other day for five months. This offers one structured approach to planning practice: establish a regular habit, then maintain a steady rhythm over time.
- Give each movement enough attention to learn its form. In the study, each exercise was performed for about a minute. Move slowly, observe your facial muscles, and pause to release tension before starting the next movement. A deliberate minute is more useful for technique than hurried repetitions.
- Build a shorter routine around the time you already have. A morning cheek routine is described as lasting 5 minutes, while an evening routine lasts 10 minutes. Choose one time of day to begin, then add another session only if it fits comfortably with your schedule.
- Include a defined repetition target for movements with one. For Simha Mudra, the recommendation is 10 repetitions. Keep the motion smooth and the rest of your face relaxed. Count each repetition aloud or silently, which helps you finish the set without adding unplanned repetitions.
- Review how often you practise after four months. The article recommends ongoing daily practice to maintain face yoga benefits after that point. Keep a simple calendar record of completed sessions, and note when your technique feels controlled. Use these observations to maintain a realistic routine and avoid letting practice become inconsistent.
- Make consistency easier with guided structure. Explore guided daily face yoga practice to support a regular routine, and choose a schedule that works with your day. Keep each session focused, follow the movement sequence carefully, and leave time to relax your face afterward.
Face Up: Face Up Method Certification
Face Up Method Certification is a next step for practitioners who want to learn Face Up’s approach to facial sculpting and somatic bodywork. For personal practice, the Face Up App Subscription offers daily self-practice rituals, while the Jaw Release Course focuses on releasing jaw tension. If you prefer hands-on facial sculpting, the Face Up Sculpting Treatment offers a practitioner-led option. Choose based on whether you’re building professional skills, developing a home routine, or seeking a treatment. These options focus on facial movement and tension release, not skincare products or injectable treatments. For details on the approach that suits your goals, visit faceup.pro.
Make Your Next Practice Session Intentional
Start by clarifying what you want from facial practice. Decide whether you’re building a personal routine or deepening your knowledge for professional work, then choose support that fits. The Face Up App Subscription supports self-practice, while the Jaw Release Course focuses on jaw tension. Practitioners interested in learning the method can explore Face Up Method Certification.
A routine of exercises for lifting sagging cheeks works best as part of a considered approach to facial wellbeing, not as a demand for instant change. Notice how each movement feels, and make room for consistency without turning practice into pressure. Small, deliberate steps can help you build a routine that feels sustainable and meaningful to you.
To explore the available learning and practice options, contact Face Up. Begin with the approach that matches your goals, and give yourself room to build a steady practice.
Frequently Asked Questions
What Are Face Exercises for Sagging Cheeks?
Facial exercises are deliberate movements that engage muscles around the cheeks and mouth. Examples include smiling while raising your cheeks or holding air inside them. Unlike massage, which uses your hands to move across the skin, these exercises rely on controlled facial movement. Practise in front of a mirror to see whether your cheeks move evenly and whether your jaw or forehead tightens unnecessarily.
How Long Do Face Yoga Results Take?
Visible changes can take different amounts of time: puffiness may reduce before contour changes become noticeable. For a useful comparison, take a photo before you begin, then repeat it in similar lighting and with the same expression. Review the images at consistent intervals instead of judging your face after every session. This makes it easier to notice gradual changes without mistaking differences in lighting or expression for progress.
Sagging Cheeks: What Causes Them & How To Lift?
Cheek contours can change as the skin and underlying facial support change with age. Facial collagen declines by about 1% per year from the mid-20s onward. A gentle routine can engage facial muscles, while massage and sun protection support broader skin-care habits. Choose movements based on the area you want to work, and avoid pulling forcefully at the skin to create a temporary lifted appearance.
What Exercises Can Help Lift Droopy Cheeks?
Happy Cheeks Sculpting, the puffer fish press, and the Cheek Lifter are commonly used cheek movements. For example, perform the Cheek Lifter by slowly lowering and raising your cheeks while keeping your jaw relaxed. Exercises for lifting sagging cheeks should use controlled movement, not exaggerated pulling. Practise one movement at a time first to focus on form before combining exercises.
What is the Biological Mechanism Behind Droopy Cheeks?
Cheek appearance reflects more than muscle activity: skin structure and the support beneath it also shape facial contours. Collagen, a structural skin protein, declines by about 1% per year from the mid-20s onward. Facial exercises create repeated muscle contractions, while massage applies external pressure. These approaches work differently, so muscle movement alone doesn’t address every factor that influences how cheeks look.
Can facial exercises lift sagging cheeks or improve cheek firmness?
Facial exercises can engage cheek muscles and help you practise controlled movement, but they don’t reposition facial tissue like a surgical facelift. Think of them as a self-practice approach, not a substitute for every method that affects facial appearance. If your goal is better movement awareness, use a mirror to observe your technique. Facial exercises and skincare habits serve different purposes when it comes to skin texture.
What cheek-lifting exercises are commonly recommended, and how do you do them?
Try Happy Cheeks Sculpting by raising your cheeks into a controlled smile, then holding the lift for 20 seconds and repeating it 5 times. For the puffer fish press, inflate your cheeks and gently press inward, holding for 5 to 10 seconds. Repeat 8 to 10 times. The Cheek Lifter uses a slow cheek-lowering and lifting movement, repeated 10 times.
How often and for how long should you do facial exercises for sagging cheeks?
A practical schedule is 15-20 minutes per day, several times a week. You can also use a shorter guided routine, with recommendations of 10-15 minutes daily. Select a schedule you can follow consistently and practise each movement carefully. If you’re short on time, choose fewer exercises instead of rushing through every movement. A simple calendar note can help you keep track of sessions.


